RSS
 

Archive for the ‘Nationwide’ Category

Yooperlite Hunting

02 Oct
By Dena Nechkash
A yooperlite found on the shores of Lake Superior, August 2021.

It is almost magical scanning the rocky beaches of Lake Superior in the dark, hoping to find a spark of vibrant orange flashing under the UV light. With the waves lapping the shoreline in a calming rhythm, it is a relaxing hide-and-seek game set in one of the most beautiful regions of the United States. Once you find that first one, you will want to keep hunting for more! 

My husband and I spent two weekends hunting for yooperlites in Michigan’s upper peninsula this summer and had a lot of success! It is very easy to do, but we came across many people who seemed to have trouble finding them or only found one. If armed with the right tools and knowledge, you too can successfully yooperlite hunt in Michigan! 

What is a yooperlite?

Yooperlites glow in a variety of patterns and colors, as demonstrated here.

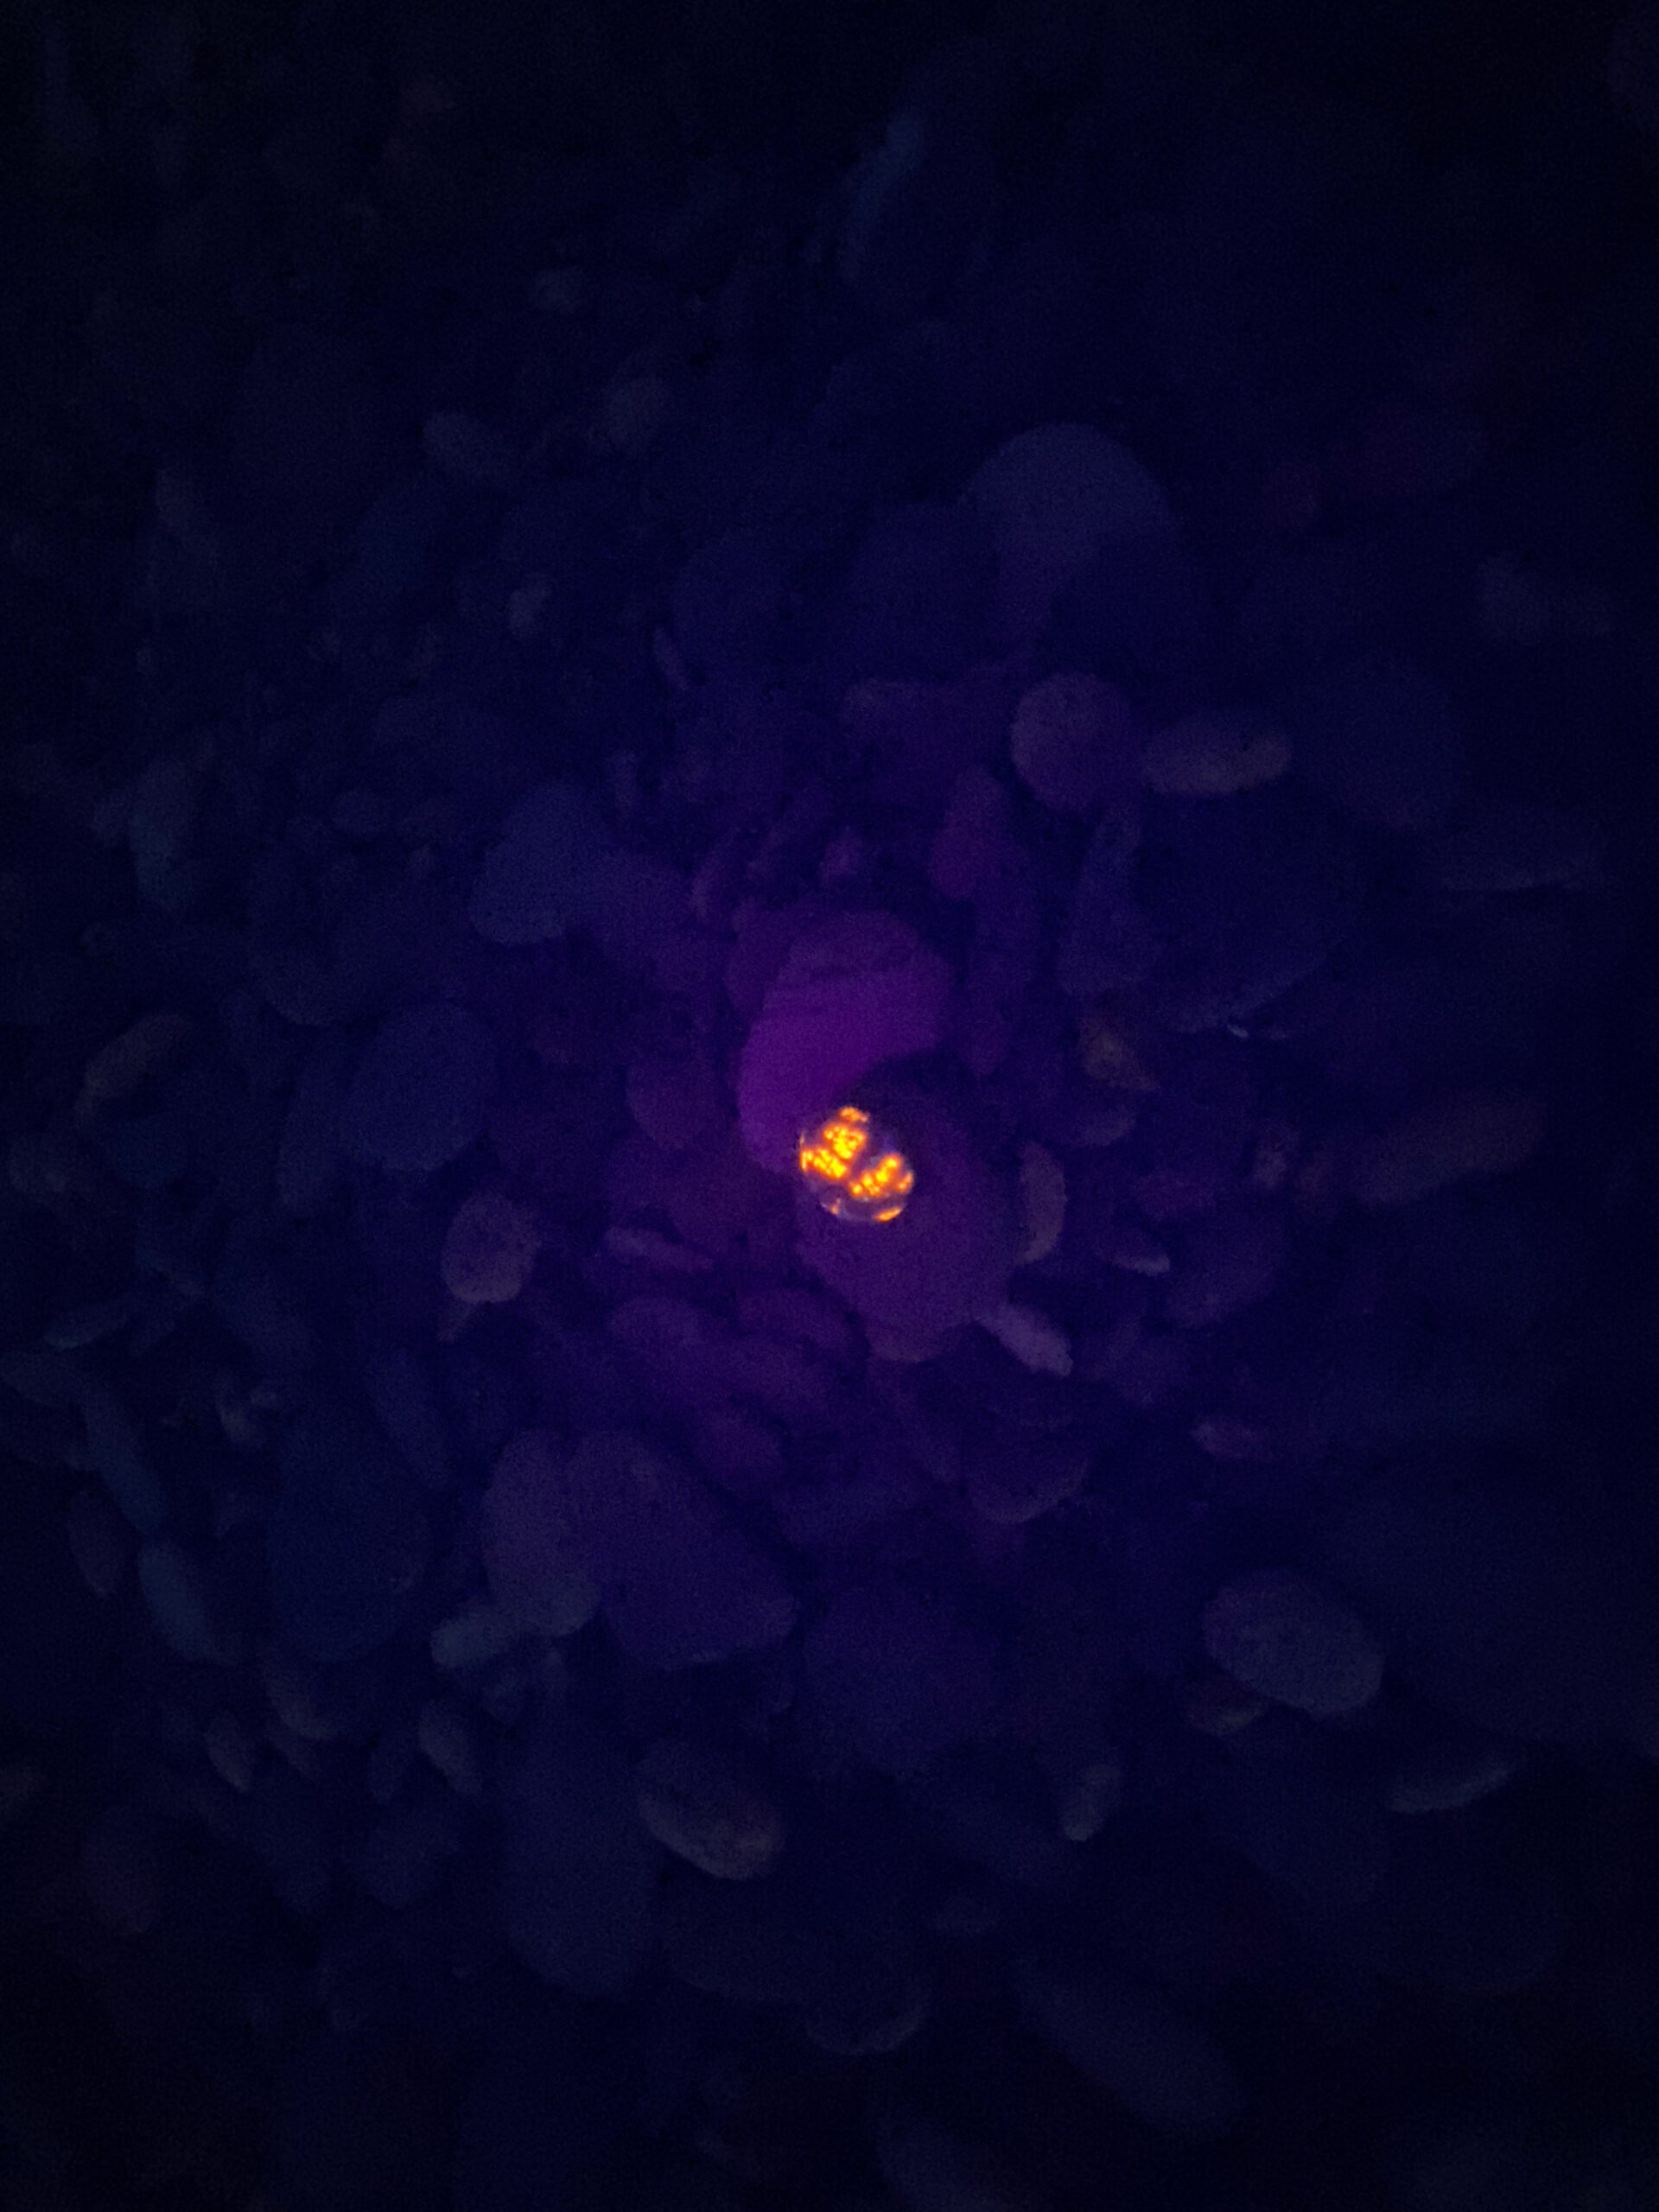
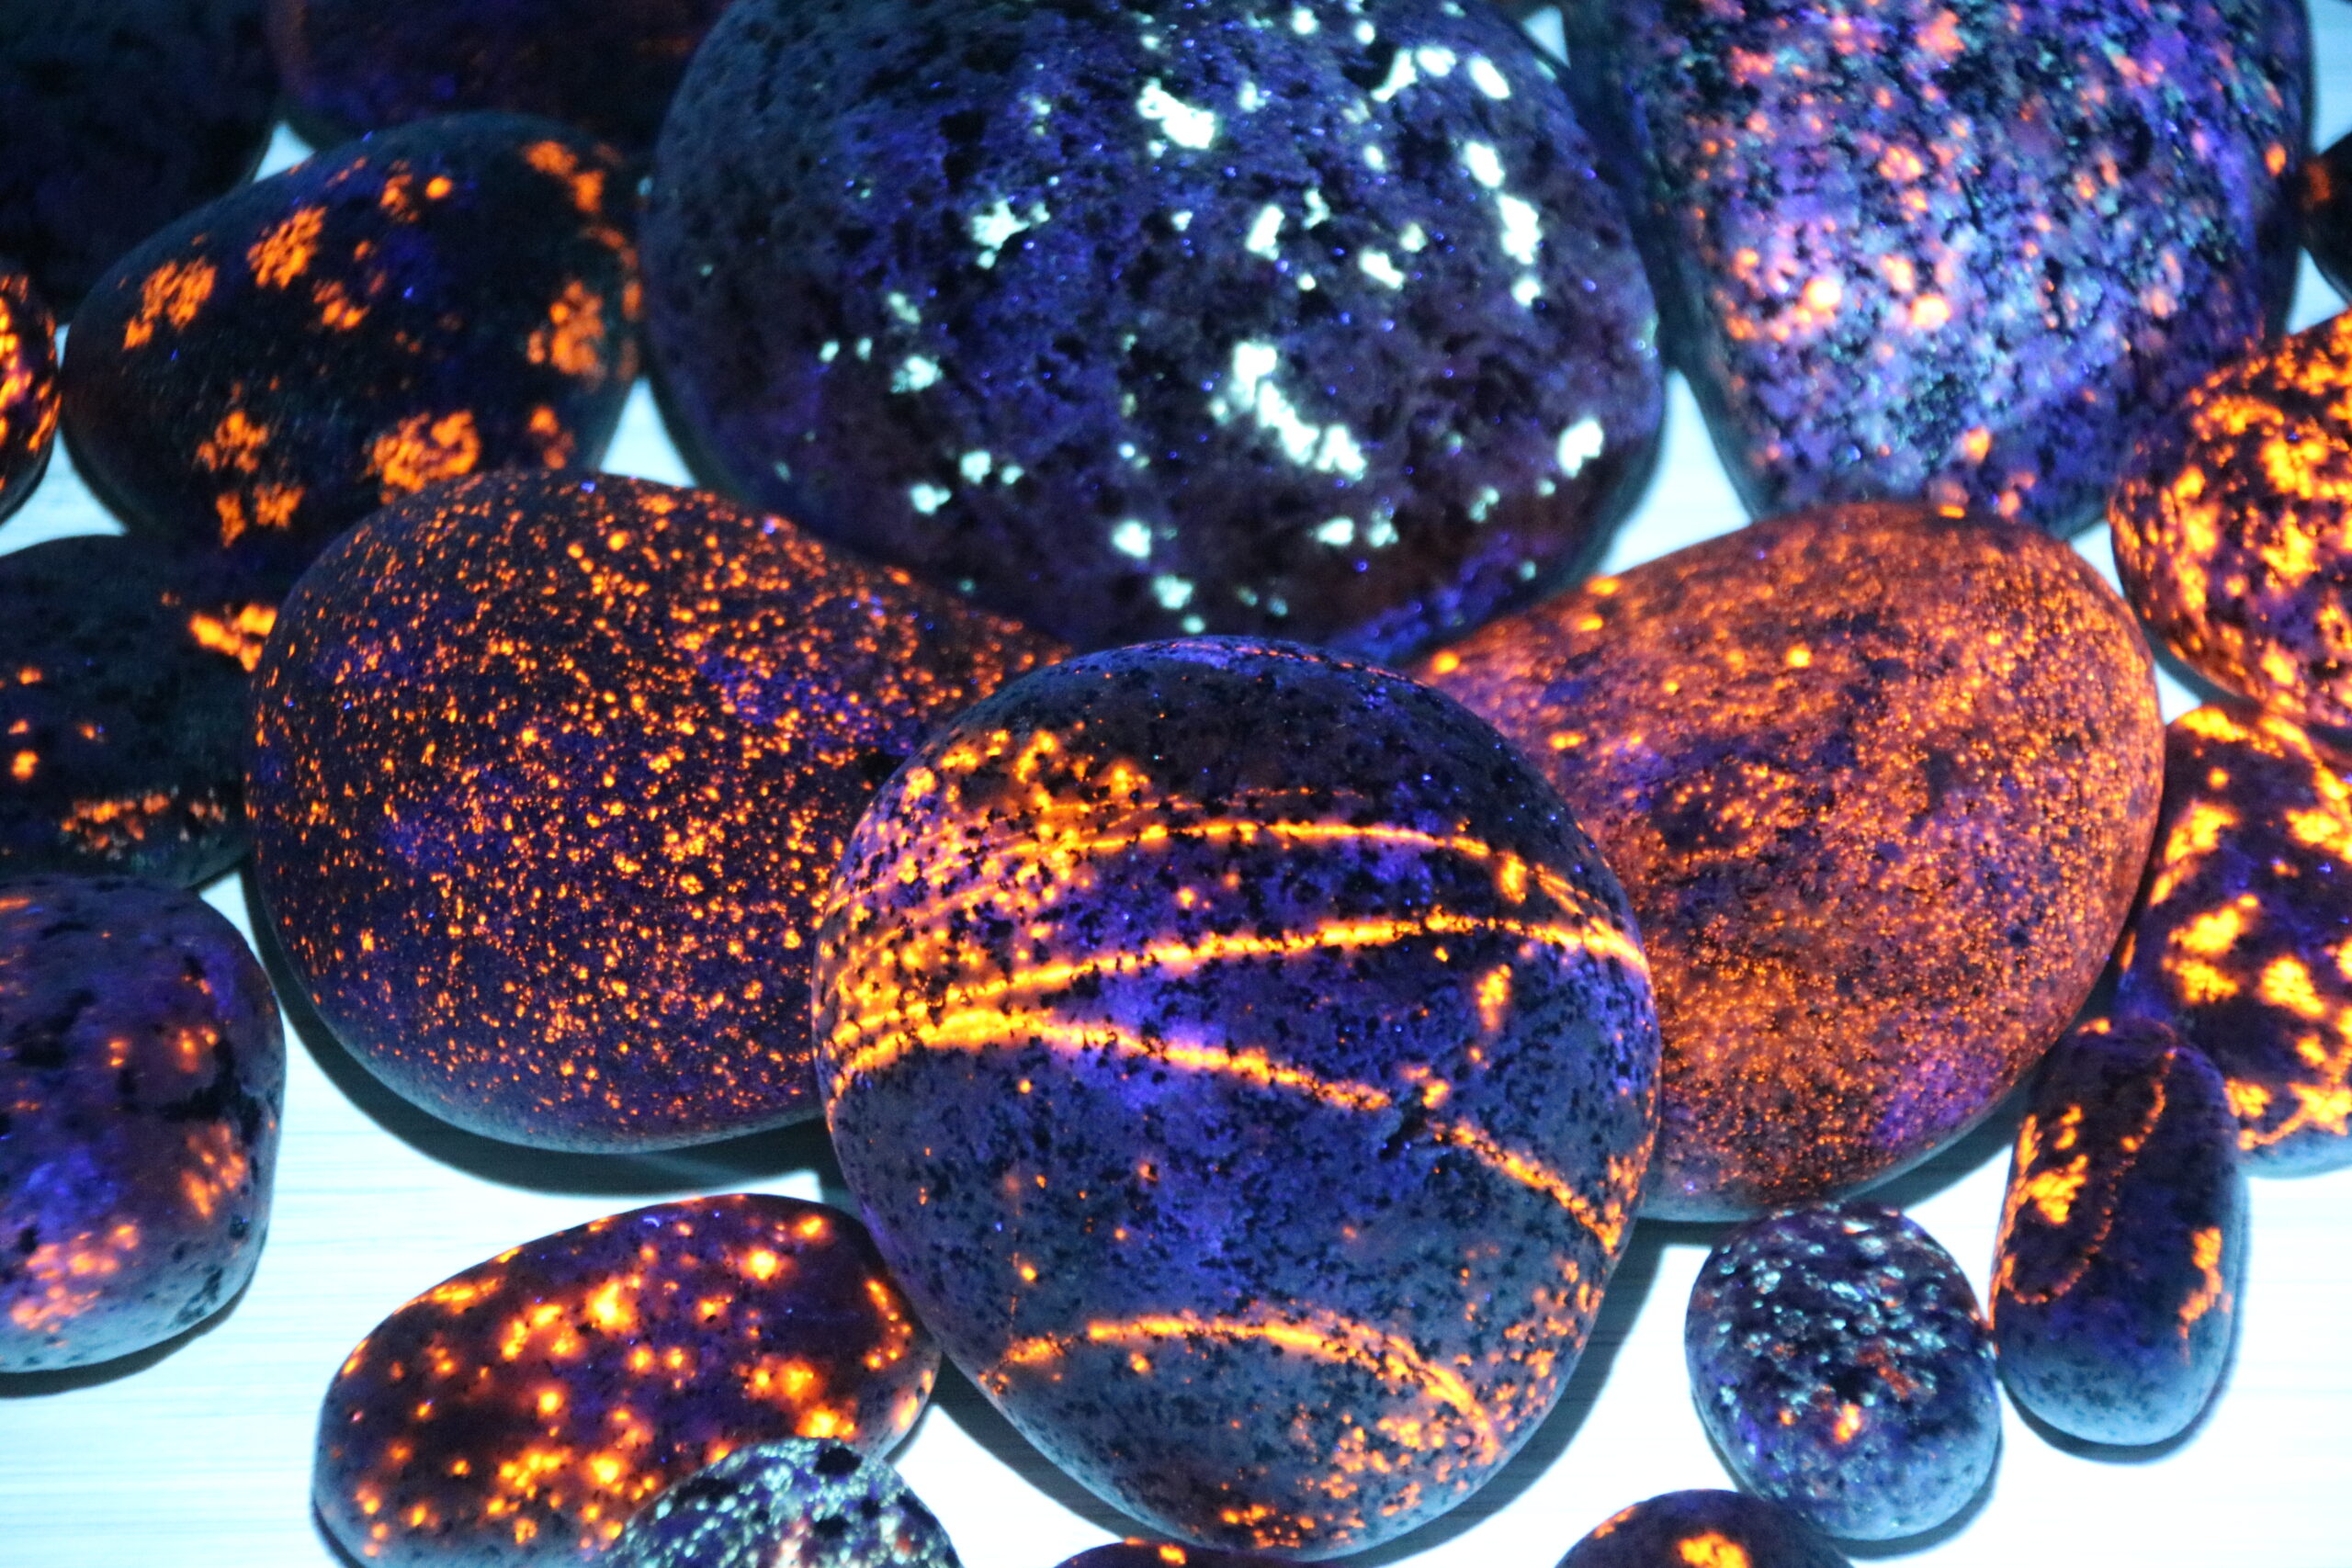
Yooperlites are fluorescent sodalite-rich syenite rocks first discovered in 2017 by Erik Rintamaki of Michigan. The sodalite glows bright orange, similar to red-hot molten lava in a volcanic rock, when flashed with long wave ultraviolet light. While most commonly found on the shores of Lake Superior, they have been found on Lake Michigan’s shores, in gravel pits and even in Tennessee due to glacial movement. They are a fairly new discovery and thus a very popular family activity during the recent social distancing recommendations. 

How do you find them?

Yooperlites are found on the shores of Lake Superior (among other places, such as Minnesota and Wisconsin) by scanning the rocky Great Lakes shores with a powerful UV (black) light. We found great success with our Alonefire brand light – a budget-friendly high powered black light – with specs of 10 watt, 365 nm. It uses rechargeable 18650 Li-ion batteries, which we would go through approximately one an hour. We saw a wide variety of lights being used, some with better luck than others. We also would continue to hunt where others had just been and still found yooperlites. Whether that was due to the differences in equipment, the shuffling of feet bringing new rocks to the surface or just pure luck, we weren’t really sure. 

Would you be able to pick out a yooperlite in daylight? Probably not. All of these are yooperlites. They don’t have one color, size or texture. They are all a little different.

I recommend also purchasing yellow UVA 400 safety glasses to protect your eyes. Long exposure to these high-powered UV lights is not healthy for your vision. We didn’t see anyone else wearing protective eyewear, but it was a risk we weren’t taking, and the glasses really weren’t that expensive for providing peace of mind. 

There are a few techniques you can use to scan the beaches with your UV light: side-to-side sweeping motion or the figure-8 motion. Try them both and decide what works best for you. I ended up switching it up based on obstacles and terrain. The sweeping motion from side-to-side seemed to work well for shorelines with an even scattering of rocks, while the figure-8 method worked better for the piles of rocks. The goal is to slowly scan the beach a few feet in front of you and quickly assess if the items that light up are a yooperlite or something else. 

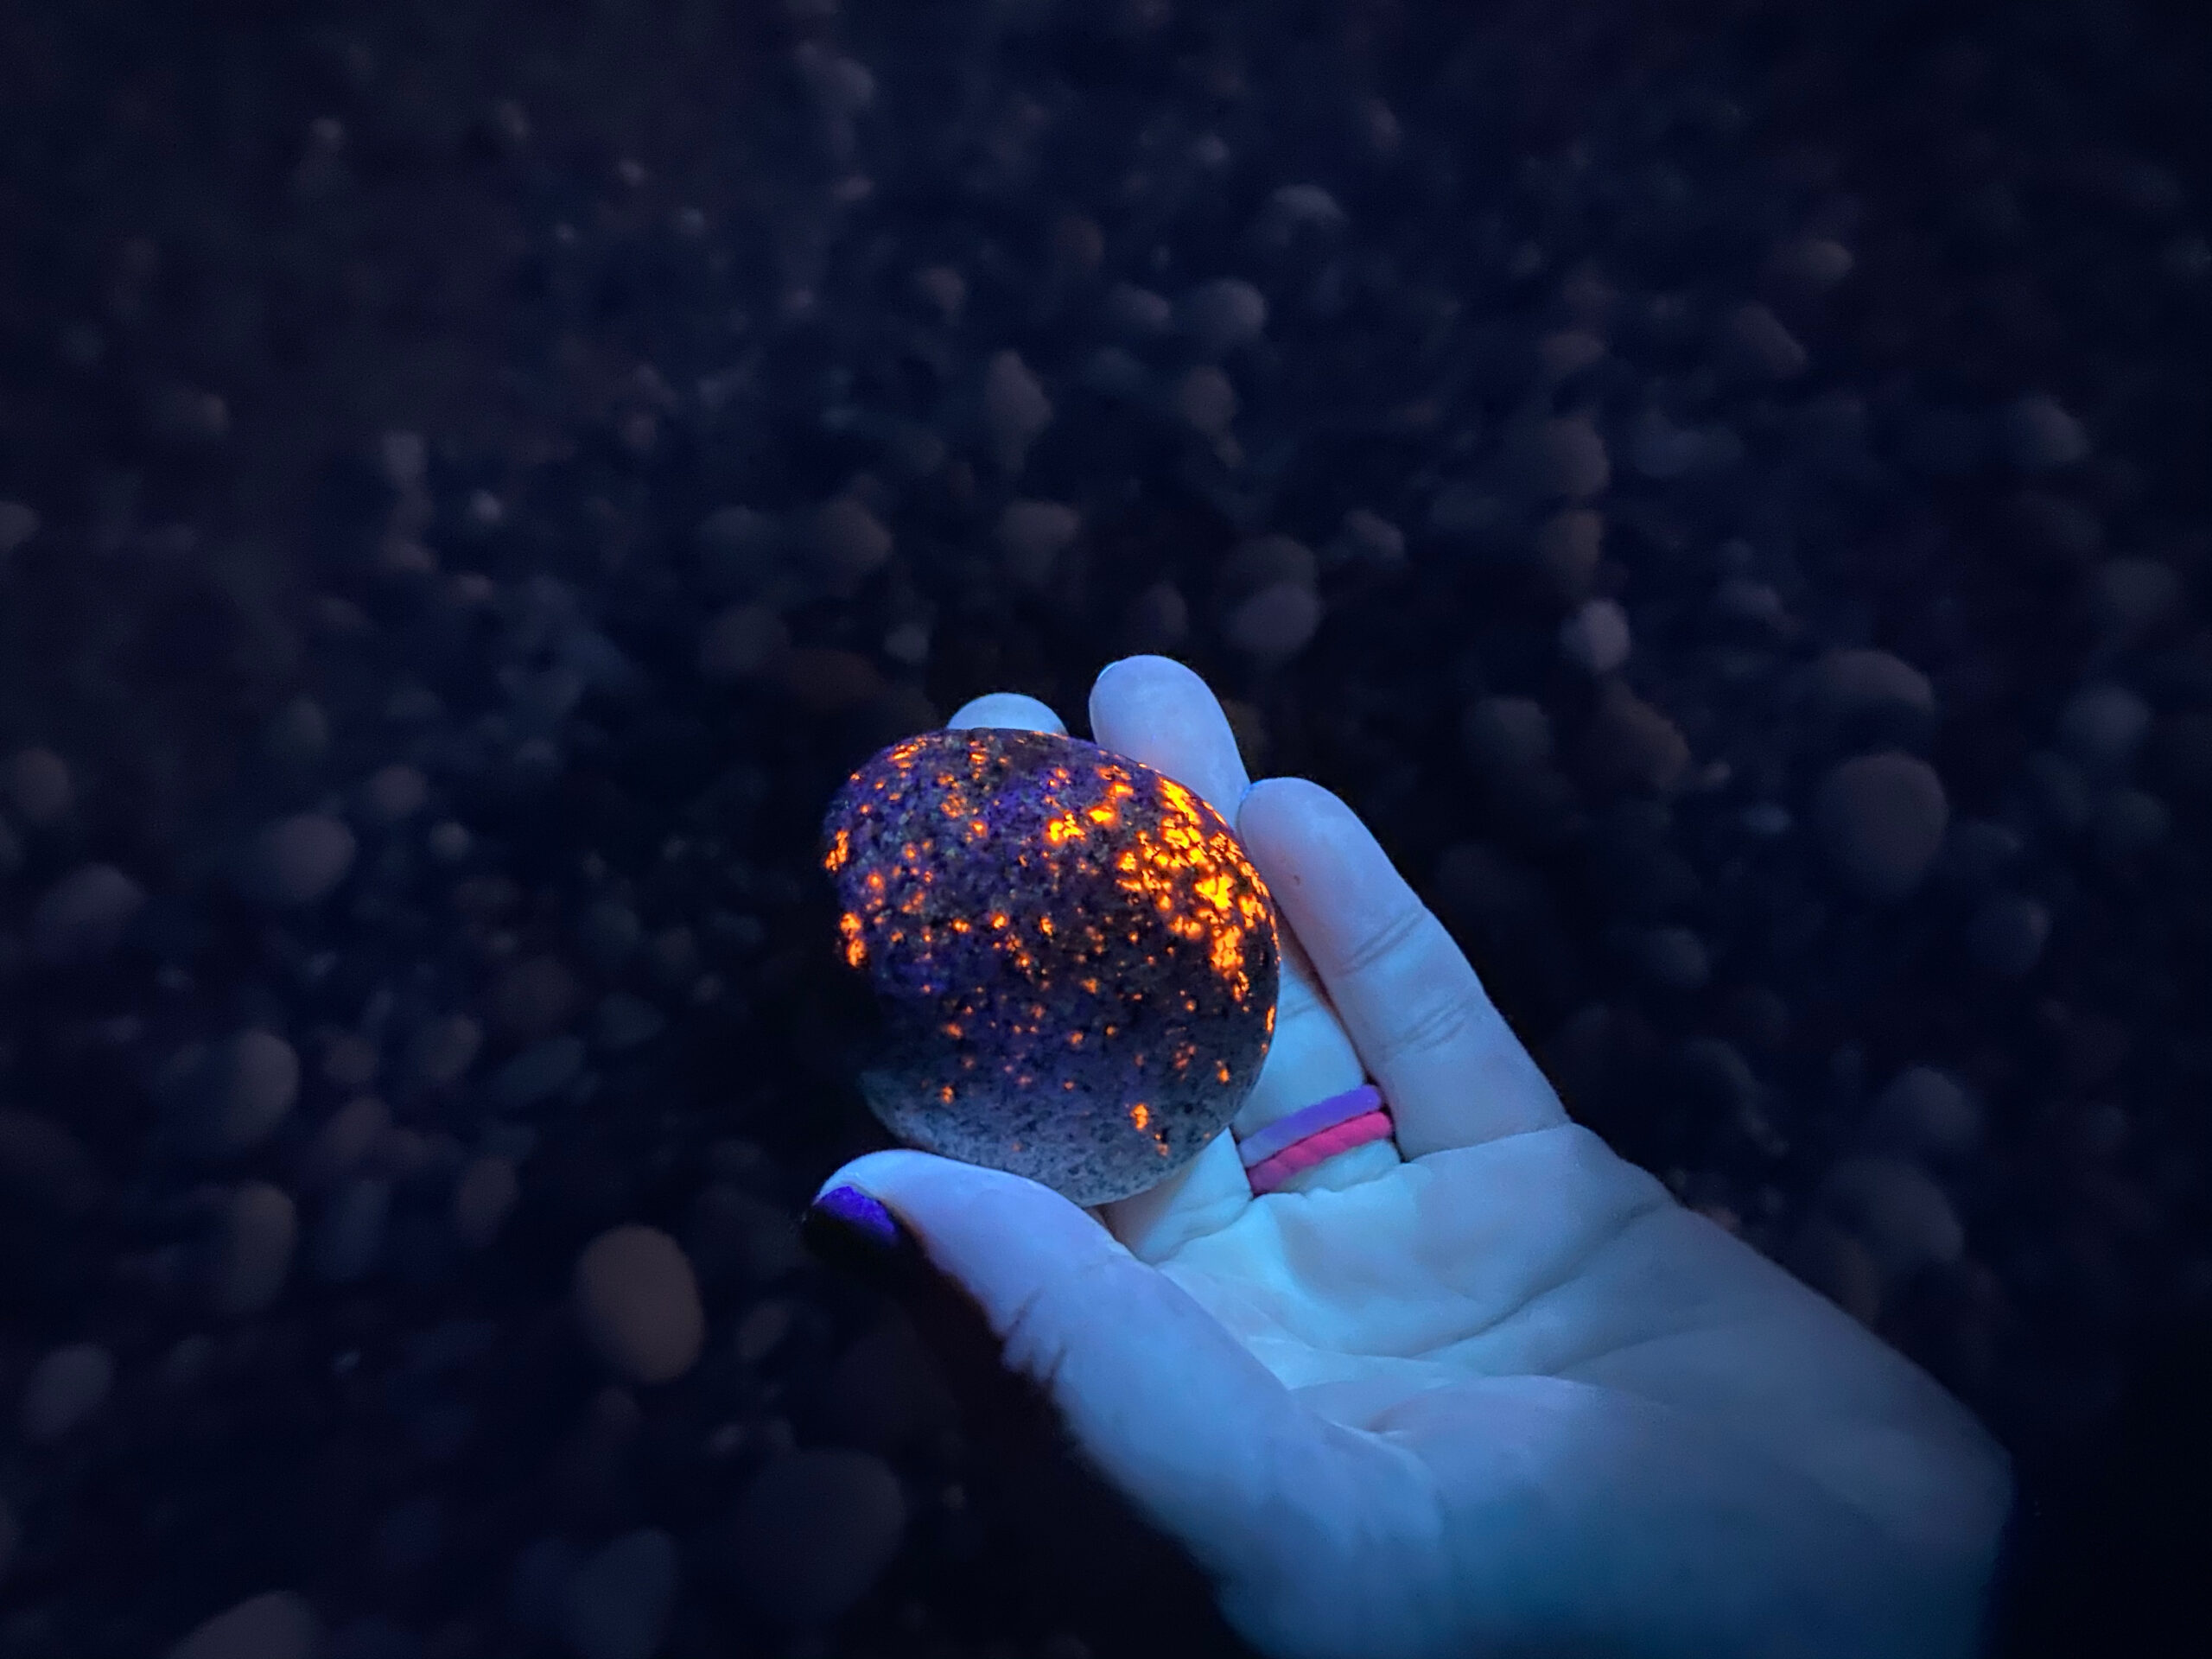
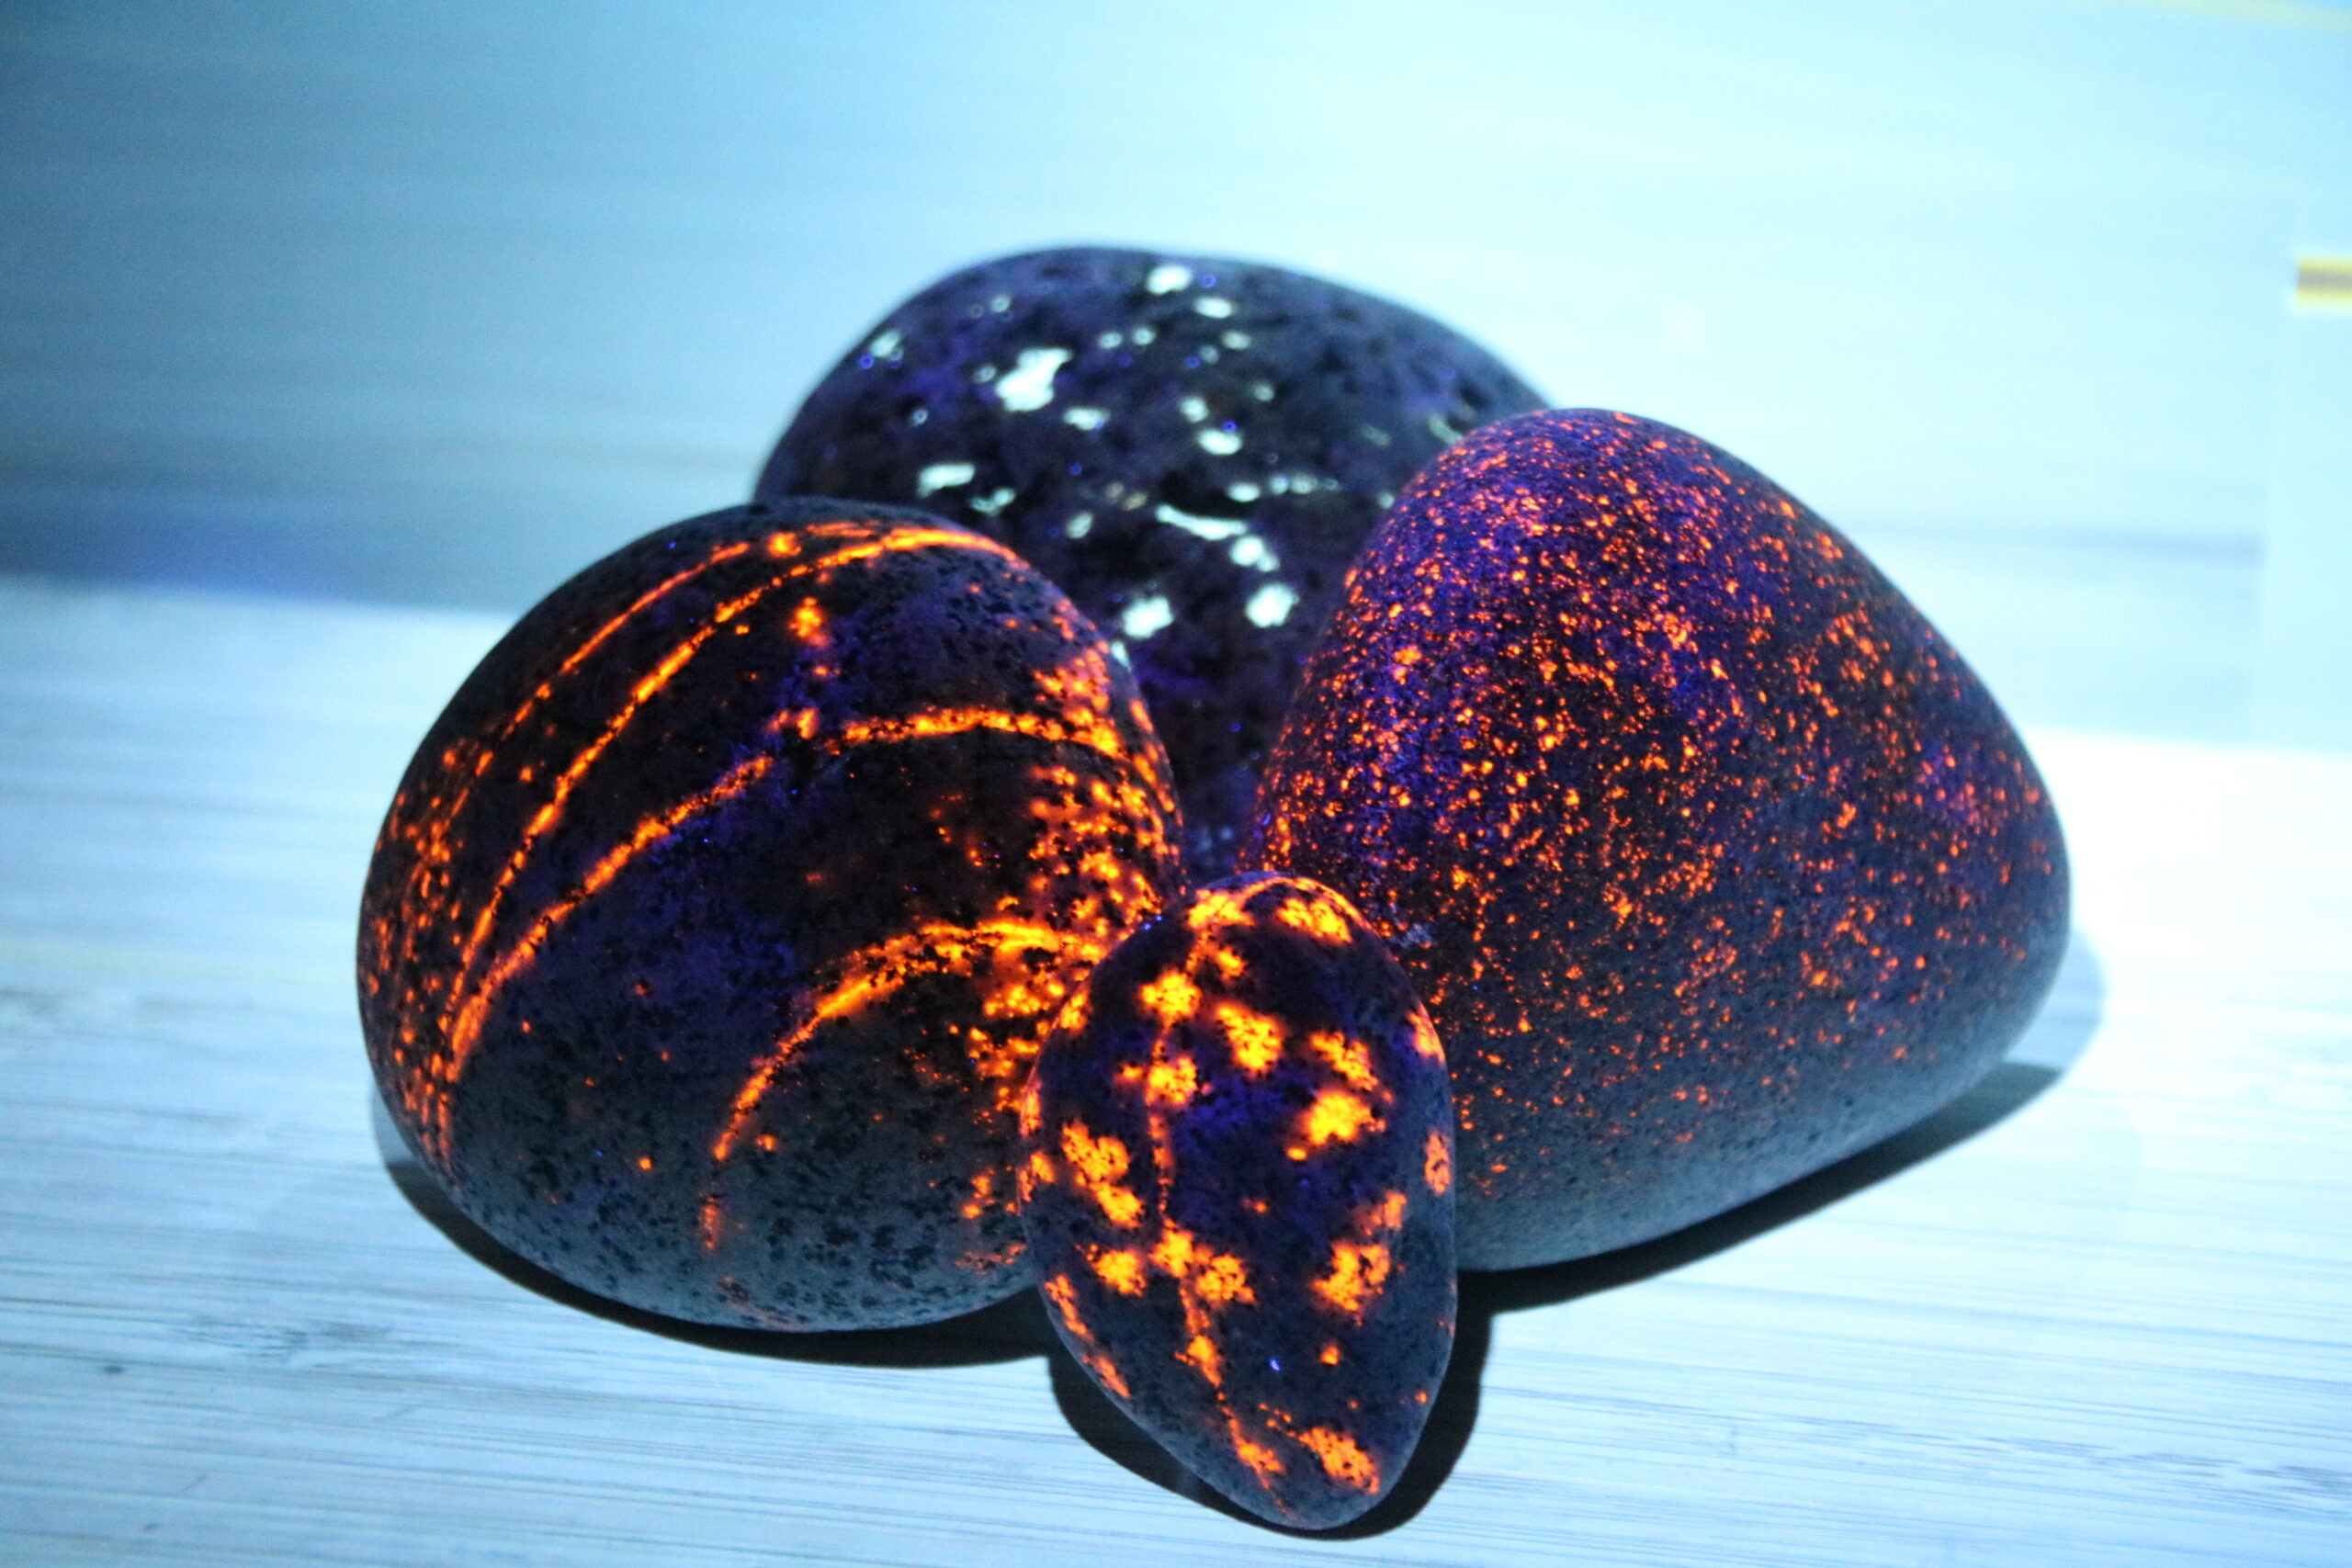
You will have many different objects catch the UV light and glow. Fossils usually glow bright white. Feathers and bird poop are usually a blue glow. Some brown and white stones reflect the UV light, too, but it is pretty easy to tell that they aren’t what you’re looking for. There are some algae-covered rocks that glow red or deep orange, but they are pretty easy to differentiate from yooperlites and their glow dies as soon as they dry. The yooperlites are a very brilliant orange, almost like flames covering the rock. Some yooperlites have also been found with a white or pale blue color that glows instead of the orange. 

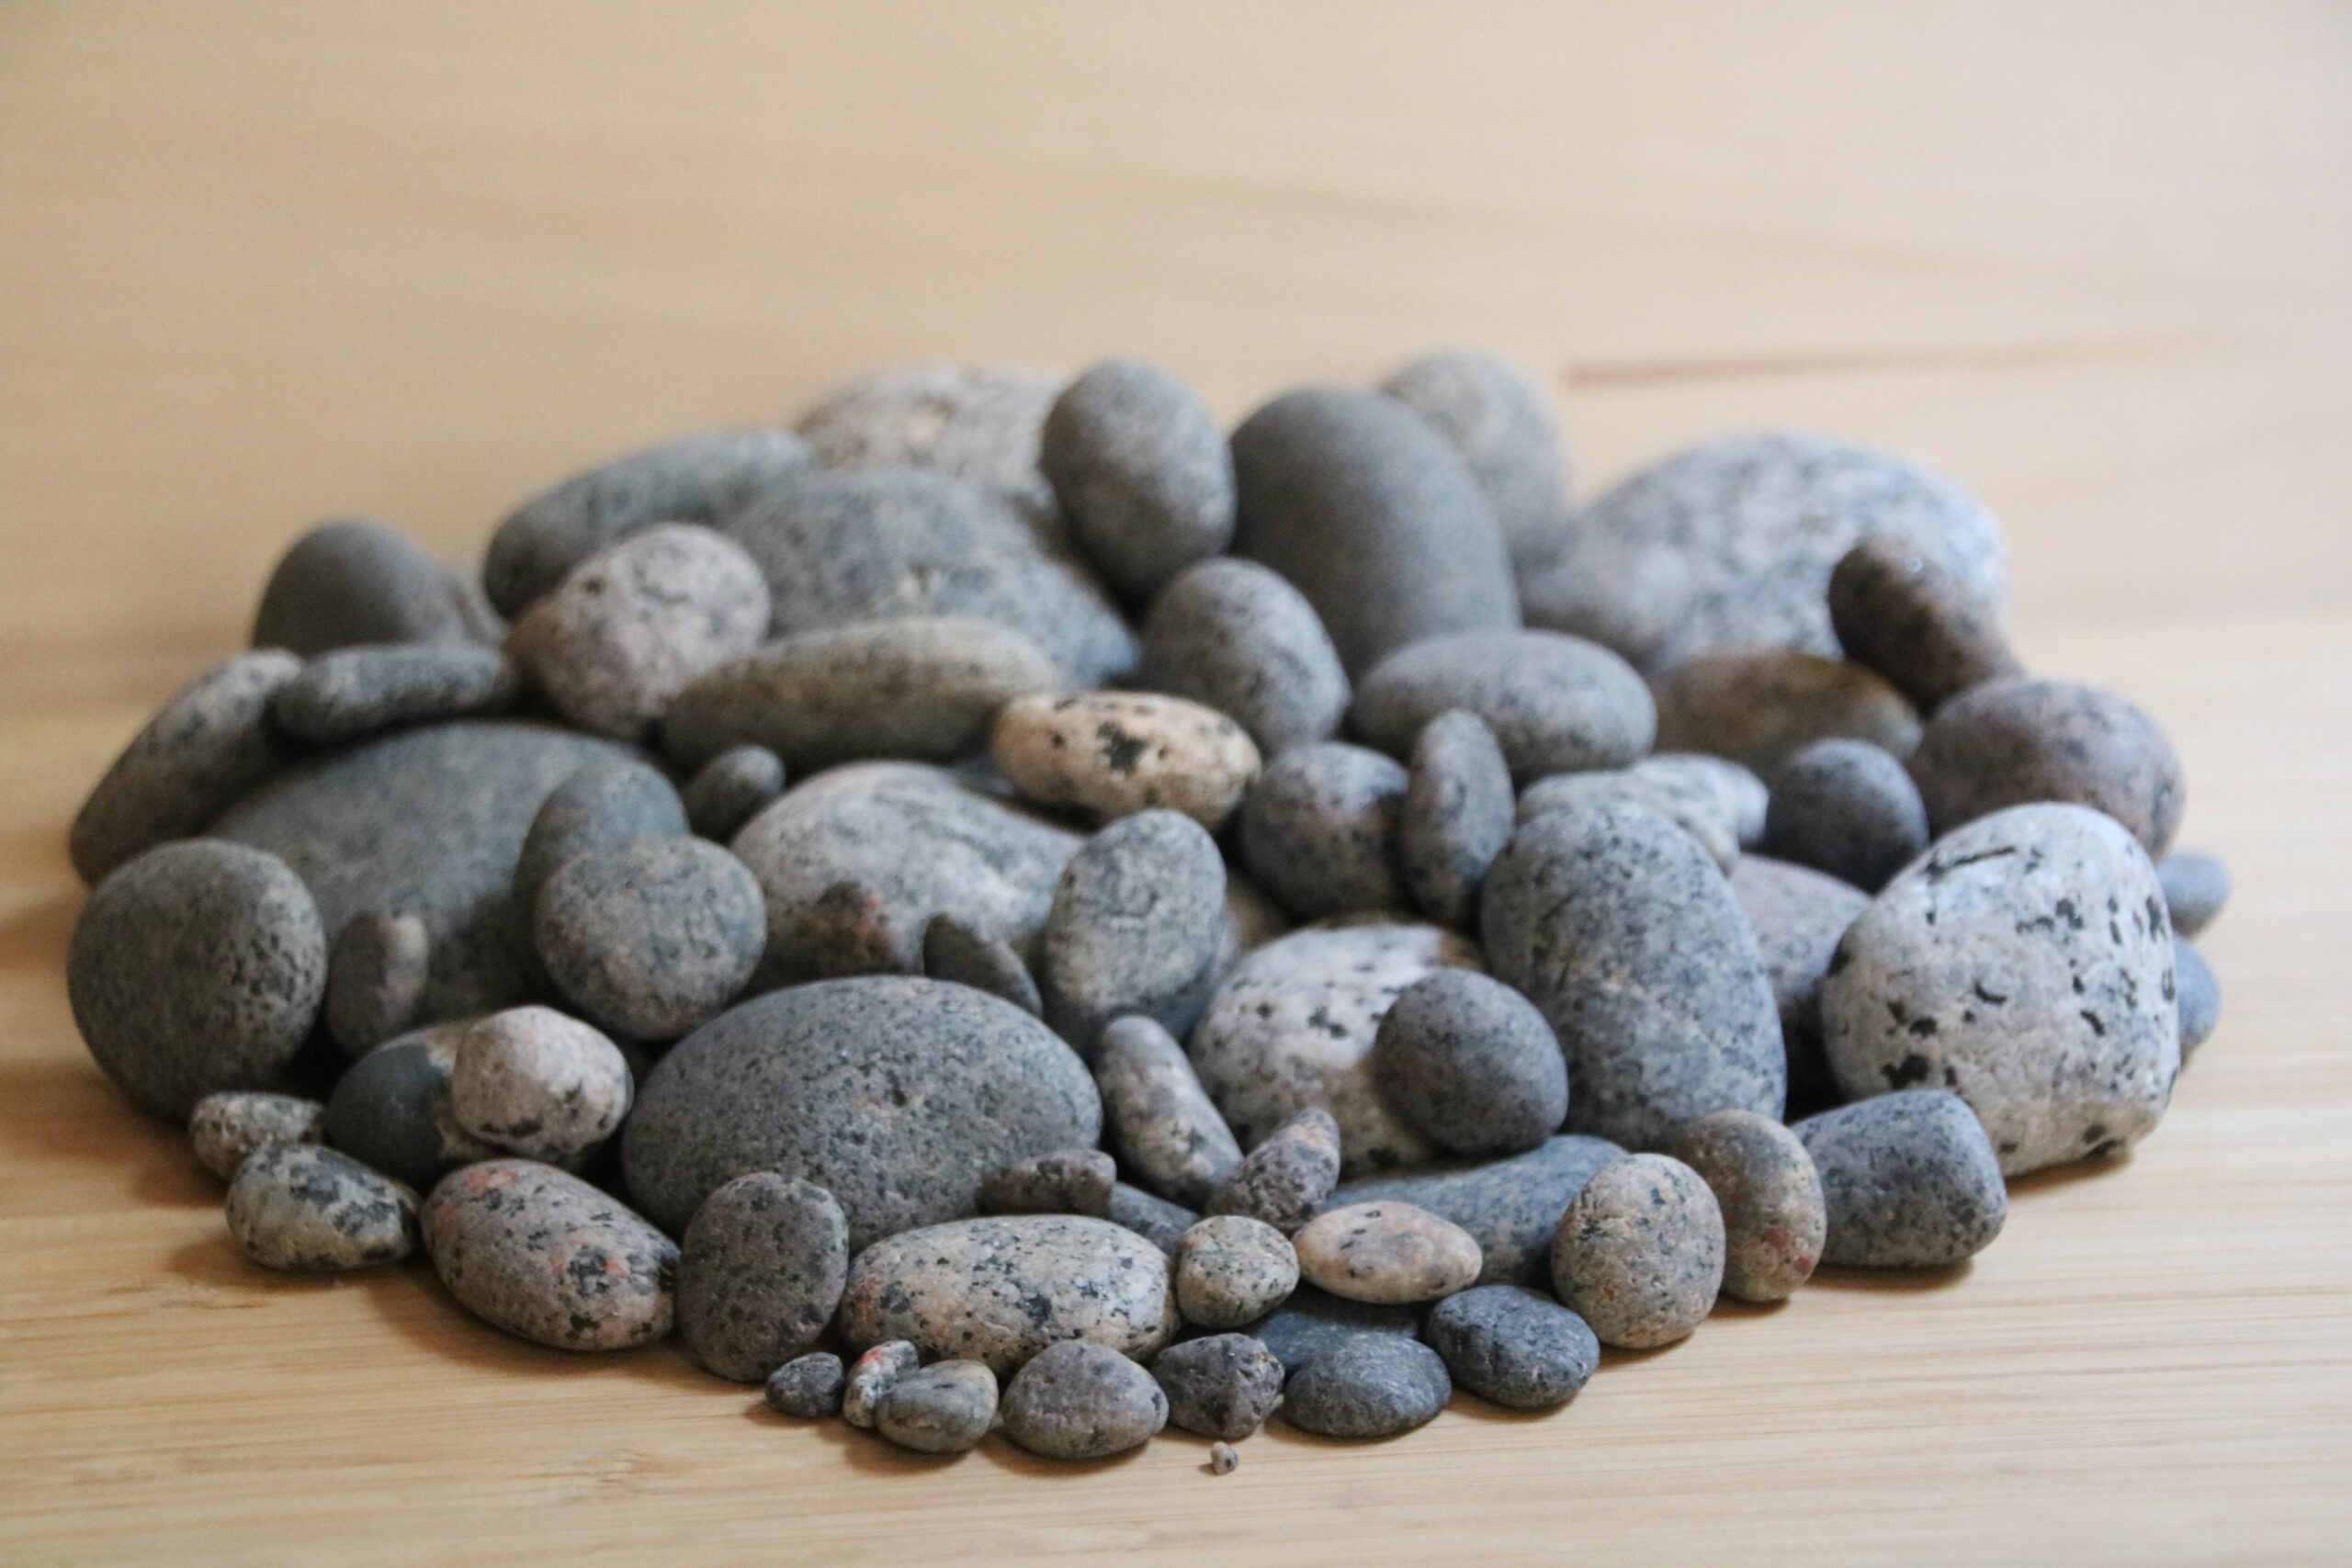
The yooperlites can be a variety of sizes. We found them as large as a mango and as small as a pinhead. Scan the dry sand further up the beach as it is often ignored. Most of the popular beaches are hunted almost every single day, but new yooperlites wash up regularly, so be sure to check the wet sand areas well. Also scan in the shallow water and see if any are near the shore. We did find several close to shore, too! 

Waiting for the sun to set so we can hunt some yoopelites!

Please, please, please abide by all posted signs and only hunt via access through public property. Do not trespass on private property to access the lakeshore. Do not ruin this hunting experience for future hunters. There are plenty of public access points, such as Grand Marais (do not hunt on the Pictured Rocks National Lakeshore), Lake Superior State Forest Campground, Muskallonge Lake State Park, Two Hearted River State Forest Campground, Crisp Point Light House, Vermillion Point Nature Preserve and Whitefish Point Light Station, to name a few. I haven’t hunted on the Keweenaw Peninsula yet, but there are some public beaches known for yooperlites there, too. 

When you are choosing which beach to try, keep in mind that not all beaches are accessible by paved road. And the rough dirt roads are a challenge for all-wheel-drive vehicles, especially in the rain, which happens a lot up there. If you get stuck on one of the dirt roads, you won’t have cell phone service to call for help and when help arrives, it is very costly because of the conditions and the time it takes to get there. Make good decisions about your destination. Having an atlas of Michigan helps, too, in case you need directions and can’t connect to the internet. It saved us more than once! 

Also, please know that Michigan limits the amount of rocks you can harvest in a year to 25 pounds per person. Please respect this and only keep up to 25 pounds of rocks in Michigan in one year. Don’t worry, it takes a LOT of rocks to add up to 25 pounds!

Tips & Tricks

I spy a yooperlite!!! They really glow this brightly while sweeping the shoreline with a UV light. It’s a glow-in-the-dark rock hunting game!
  • Use the correct equipment. 
    • UV light
    • Yellow protective glasses
    • Rock collecting bag
  • Dress comfortably for a walk on a rocky beach at night. 
    • Wear layers, it can get chilly at the water edge. 
    • Wear non-slip sandals or rain boots. Plan to get your legs wet. 
  • Check the forecast before heading out. Do not continue to hunt during a storm. 
  • Scope out the beach in daylight to know the terrain and plan for the equipment you may need. 
  • Get there early! It’s become a very popular activity and the beaches are all filling up with hunters at sunset. 
  • Avoid crowded beaches or walk a distance from the parking area to find an untouched area to hunt for the best success. We found that walking to a distant part of the beach at sunset and then waiting until it is dark enough to walk back gave us an advantage. 
  • Leave a glow stick at the entrance to the beach so you can find your way back. Please take the glow stick with you when you leave! 
  • Bring a backpack for your supplies, like water. And actually DRINK water while hunting. 
  • Consider having a separate rock hunting bag (I use a modified lingerie wash bag, which I added a crossbody strap to; my husband has one with a carabiner clip added). 
  • If you plan to dig in the rocks, bring gardening trowel or small rake to help. 
  • Keep your UV light moving, sweeping the beach. 
  • Secure your light to your wrist so it doesn’t fall into the water. 
  • Search all parts of the beach: dry sand, wet sand, shallow water.
  • Avoid obstacles like fallen trees or large boulders by turning on your flash light occasionally to check the terrain ahead of you. 
  • Give your eyes time to adjust to the UV light. It will seem very dim at first. 
  • When you pick up the yooperlite, give the rocks around it a shuffle. Sometimes there are others nearby. 
  • Watch behind you. Sometimes your footsteps uncover yooperlites. 
  • Take it slow. You’ll see lots of other things glow in the UV light, but you’ll know when you found a true yooperlite. 
  • Visit the beaches after big storms for better hunting. The big waves wash up more of the yooperlites. 
Try to find your own yooperlites.

Packing Checklist

  • UV light
  • Protective glasses
  • Drinking water
  • Rock collecting bag with small holes to let the sand fall through
  • Fast-dry clothing
  • Water shoes or rain boots
  • Backpack
  • Bug spray
  • Headlamp or flash light
  • Towel (for cleaning up when get to the car)
  • Bag for sandy shoes (also for at the car)
  • Extra shoes (who wants to drive in sandy shoes?)
  • Friend – because two sets of eyes are better than one!
  • Optional, based on the weather: rain jacket, stocking cap, gloves

While yooperlite hunting is strictly a night activity, there is a lot to see and do in Michigan’s Upper Peninsula during the day, too, including museums, lighthouses, waterfalls, state parks, national lakeshores, agate and fossil hunting, hiking or biking, scenic drives or just relaxing on the beach. We were able to cram quite a bit into our two weekends up there. We made it to Grand Marais Light House, Tahquamenon Falls State Park, Crisp Point Light House, Muskallonge Lake State Park, Whitefish Point Light Station, Two Hearted River State Forest, Curley Lewis Memorial Highway Scenic Drive, Point Iroquois Light House, Soo Locks, and Vermillion Point Nature Preserve. 

This was actually our third trip to the U.P. this year! We made the trek to Munising and Marquette in winter to ice hike and check out the frozen waterfalls. They were spectacular! ANd we were able to get some great pictures because not many people venture out in the cold. You’ll have to fight the snowmobilers for hotel rooms, though! 

NOTE: I am not affiliated with any of the companies or products I recommend in this article. I am simply sharing specifics that I personally have experience with. 

 
Comments Off on Yooperlite Hunting

Posted in General Travel, Nationwide, Uncategorized


Invest in Exploring

29 Aug

Invest in travel.

Invest in travel.


Explore the World

25 Sep

There is so much to see; don't let it pass you by. Photo by Dee Harris

There is so much to see; don’t let it pass you by. Photo by Dee Harris


Taking flight

23 Sep

By Dee Harris

Here it is, less than a week from a long-awaited vacation to visit my dad in New Mexico, and I’m nervous. It’s been a while since I’ve flown and I’m doubting what I remember from the previous experience.

I’m worried I won’t have everything, will pack something I shouldn’t or even miss my flight. So, for all of those who have done it before but still aren’t quite sure they’ve remembered everything, here’s a handy little checklist:

I miss this view from above the fluffy clouds.

I miss this view from above the fluffy clouds. Photo by Dee Harris

Pack:

-Liquids should be in 3 oz. bottles or smaller and packed in a clear plastic bag.

-Don’t forget your toothbrush, pajamas and electronic chargers. Those are the things I most commonly miss.

-Roll your outfits together to save space and ensure you have all you need for the duration of your trip. Rolling your clothes together also prevents wrinkles. Who has time to get out the iron in the hotel room while on vacation???

-You will need something to occupy your time while waiting for your flight(s). Bring something to read or a game to play, even music to listen to. People watching can be entertaining, but it can also get old. I will make sure my Kindle and iPod are charged.

Prepare:

-Print your tickets and itinerary information.

-Contact a family member or close friend and tell them when you’re leaving, where you will go and when you plan to return. Leave an emergency contact number so they can reach you if necessary.

-Don’t wait until the last minute to pack. Have your bags packed the night before except for a few essentials. You don’t need to stress out right before traveling.

-Wear comfortable clothes and shoes. Be prepared to remove sweatshirts and shoes at the security checkpoint. Slip-on shoes and zip-up sweatshirts work best for this situation. The less bothersome your apparel, the easier it is to get through the line. Avoid flip flops; do you really want your bare feet on those nasty floors?

-Research the rules and regulations for bringing items to another country or bringing items from another country. Some things just can’t cross the borders.

Travel:

-Arrive early. Plan to be at the airport several hours before your flight. I’ve read they want you there approximately three hours early. Depending on the airport, you probably don’t need that much time. Some of the smaller airports, especially when you’re not leaving the country, have fewer people to maneuver around and less space to traverse. You should at least be there an hour before your flight, although that might be cutting it.

-Have someone lined up to pick you up from the airport or have the number of the cab service or car rental company with you. If renting a vehicle, it’s best to order ahead of time and hurry to their service as soon as your flight gets in to avoid long lines and the possibility of them giving your reserved car to another. It happens, unfortunately.

Avoid:

-Do not pack a weapon of any sort. There are rules and restrictions for what is allowed and where. Avoid the hassle and just don’t bring them.

-Do not post your plans on social media. This is the best way for someone to know that you won’t be home on certain dates so they can break into your place to steal your stuff. Or it alerts people that you’ll be away and can do scams. Keep your plans quiet as much as possible.


Stairs to Adventure

08 Sep

You have to take a few steps back to take in the full view of the M from below.

You have to take a few steps back to take in the full view of the M from below.

Article and photos by Dee Harris

The world’s largest M is known for its 266-stair climb and miles-long view, but the majority of visitors think that’s all there is. A geocaching experience showed me there is so much more to this well-known attraction.

When you get to the top, stop to catch your breath, take a sip of water, then veer right to choose your own little bluff to watch the traffic below or maybe catch a glimpse of the hard-working Amish in the tobacco fields. The trail isn’t groomed, so be prepared for thorns and vines to attach themselves to you.

Don't let the 266 stairs scare you from climbing to the top. The view is worth it.

Don’t let the 266 stairs scare you from climbing to the top. The view is worth it.

When you make your way back to the beginning (it’s a short loop), go the opposite direction and find the path that leads into the woods to the north of the M. At first, it’s just another dirt path that winds through the trees. But look harder.

Check out the rocks along the path. I’ve found shells embedded in some. Open your eyes to the berries, fungi and flowers growing just off the path. Listen for the overgrown forest creaking against itself and the squirrels playing in the treetops.

Just when you think you’ve seen it all, you’ll come across some small rock formations that look like they’re barely being held together. The cracks are so deep they could almost just fall apart. Go a little deeper into the woods and the rock formations get bigger, creating enormous moss-covered walls. There are plenty of opportunities for simple rock climbing. Get your hands dirty. Explore every surface. Maybe you’ll find a caterpillar like I did. Maybe a vine spinning around a flower stem. Maybe something even more of a treasure.

Eventually you’ll come across “The Hobbit Hole,” a cave that someone made into their own temporary fort. Of all of the times I’ve been up there I’ve never actually seen anyone in there, but there are always new additions to the abode. There are several small caves just off the trail that are able to be explored. I’m not much for exploring caves; they give me the creeps. But I know some people really enjoy all that goes with spelunking.

Head into the woods to check out the rock formations along the trail.

Head into the woods to check out the rock formations along the trail.

The trail gets narrower and narrower the further from the M you get. Eventually a pile of rocks (maybe a former fire pit someone assembled?) marks you’re near the end of the mound. You can go just a bit further before it leads downhill in all other directions.

When you turn around, you’ll see a whole different side of the woods on the way back. There are so many details you probably missed the first time through. Take your time and enjoy the sight.

According to the University of Wisconsin-Platteville, the M is an iconic symbol of the mining tradition that was the basis for the college. Located four miles east of Platteville, the M was first established in the snow on the hillside in 1936.

From a June 26, 2012, article at uwplatt.edu:

As history tells it, Wisconsin Mining School students Raymond “Pat” Medley ’37 and Alvin Knoerr ’37 stomped a large “M” in heavy snow on the Platte Mound in 1936. “It took several trips in parallel to widen out the path so that it would show up at a distance,” explained Knoerr in Thomas B. Lundeen’s book, “Jubilee! A History of the College of Engineering, The University of Wisconsin-Platteville, 1908-1983.”

“Shortly before sundown we walked back to Platteville and were happy to note that the ‘M’ could be discerned at a distance,” said Knoerr in the book.

The weather was particularly cold and the image of the “M” was frozen in the hillside. “This freeze contributed to the life of the snow ‘M’ and to its visibility, because a noticeable amount of dust or other material accumulated in the frozen pathway to make it more visible,” recalled Knoerr.

The following spring, a classmate of Knoerr suggested they construct a stone “M.” Another student suggested they make it the largest “M” in the country, even larger than the Colorado School of Mines’ “M,” which was 200 feet high.

The school obtained permission from landowner William Snow to construct the “M,” which is 241 feet high and 214 feet wide.

Shortly after beginning the project, H.B. Morrow, director of the Wisconsin Mining School, approved a field day for students to help construct the “M.” Students used picks, crowbars and wheelbarrows to move an estimated 400 tons of limestone to form the “M.”

The “M” was completed in the fall of 1937.

Throughout the years, the “M” has been cemented, limed and whitewashed.

The outline of the “M” is lit once each year in the fall and for special occasions, using coffee cans containing kerosene. Wicks made from sound-deadening board are lit inside more than 200 cans.

Following the Snow’s death, the 90 acres became the property of L.R. Clausen. He later donated the property to the Wisconsin State College and Institute of Technology. The Platteville Mining School became the Wisconsin Institute of Technology in 1939 and later merged with the Platteville State Teachers College in 1959 to become the Wisconsin State College and Institute of Technology at Platteville. In 1971, the name changed to the University of Wisconsin-Platteville.

The land remains under the ownership of the Board of Regents of the University of Wisconsin System, and the property was later named Clausen Park.

The Platteville Mound is one mile long and approximately one-half mile wide, 150 feet high and 450 feet above the city at the summit of the hill. The “M” was built on the south side of the hill at a 45-degree gradient.

The “M” is maintained by VECTOR, a student organization on campus consisting of representatives of organizations within the College of Engineering, Mathematics and Sciences. Maintenance includes whitewashing the “M” with lye at least once a year.

There are several Amish farms surrounding the M. It's a good view of the tobacco fields, too.

There are several Amish farms surrounding the M. It’s a good view of the tobacco fields, too.


Dickeyville’s Hidden Gem

06 Sep

There’s a little mystical piece of art hidden away in Southwest Wisconsin.

Dickeyville Grotto, Dickeyville, Wis.

Dickeyville Grotto, Dickeyville, Wis.

The Dickeyville Grotto is a collection of shrines located in Dickeyville, Wis. To get to this magical attraction, exit from Hwy. 151 at the Dickeyville exit and drive north on Hwy. 60 through Dickeyville. A large sign will welcome you on the south side of the highway at Holy Ghost Catholic Church.

According to a pamphlet of information available at the site, the Grotto and Shrines are the works of Father Matthias Wernerus, a Catholic priest and pastor of the church from 1925-1930. He constructed the art pieces during his time at the church and dedicated the work to “the unity of two great American ideals—love of God and love of country.”

Dickeyville Grotto3

A family walks through the Dickeyville Grotto in Dickeyville, Wis.

At a distance, it looks like rocks piled to form arches, crosses, walls and shapes, but a closer look reveals the creation is a collection of materials—colored glass, gems, antique heirlooms of pottery or porcelain, stalagmites and stalactites, sea shells of all kinds, starfish, petrified sea urchins and fossils, coral, amber glass, agate, quartz, iron, copper, lead, fool’s gold, rock crystals, onyx, amethyst, coal, petrified wood and moss—secured in stone and mortar.

The Grotto garden contains many different shrines: the main shrine which houses the grotto of the Blessed Virgin, patriotic shrine, sacramental shrine of the Holy Eucharist, Sacred Heart shrine, Christ the King shrine and the Stations of the Cross.

All of these individual shrines were made without a blueprint. Imagine creating such a large piece of art without any formal plans.

Dickeyville Grotto, Dickeyville, Wis.

Dickeyville Grotto, Dickeyville, Wis.

The grotto is open to the public and guided tours are available June 1 to Aug. 31, seven days a week from 11 a.m. to 4 p.m. and September and October on weekends only. There is no specific fee for visiting the grotto, but all donation s are used for the upkeep and maintenance of the grotto and grounds.


More information:

www.dickeyvillegrotto.com

608-568-3119


Keep Exploring

07 Aug

With the weekend approaching, I wanted to provide a little eye candy from Southwest Wisconsin. I believe you can find beauty no matter where you explore: a trip overseas or your own backyard. That’s why I’m promoting Southwest Wisconsin through this page. I see it as a hidden gem full of secrets and adventure. Get out there. Explore.

See


Floating Fun

04 Aug

A typical weekend view of the Sugar River near Albany, WI, during the summer.

A typical weekend view of the Sugar River near Albany, WI, during the summer.

Connect a few inflatable tubes together, invite your friends and get in the water for a summertime activity that relaxes and rejuvenates.

According to Time Magazine, tubing was allegedly invented in Thailand by Princess Chumbhot of Nagar Svarga sometime in the middle of the 20th century.

Tubers, whether connected by rope or untethered, are led downstream at the mercy of the waterway. The rope keeps a group together to allow for conversations and assistance maneuvering around obstacles such as rocks, logs and branches in or near the body of water. You’re sure to come upon something.

Last weekend I joined my cousin and a couple of friends for a tubing adventure down the Sugar River at Albany, WI, and I thought of a few tips I’d want to offer for anyone who has never been tubing.

Tubing Tips

  • Splurge for the cooler tube: Most tubing companies will offer another tube which nobody rides in, but holds the cooler. This is beneficial for longer rides on extremely warm days to keep beverages cool. If consuming alcohol, alternate with water to stay hydrated.
  • No glass bottles or glass of any sort: Nobody wants to cut themselves walking on broken glass. In a river, it’s difficult to see what is on the bottom. Avoid bringing breakable items to prevent future injury.
  • Towel or no towel: Usually a towel isn’t necessary while on a tube. The point is to get wet to cool down on a hot day. Some people like to bring one to use as a headrest or to keep dark-colored tubes from being too warm against sensitive skin. Definitely keep a towel in your vehicle for the ride home, though. There is no avoiding getting at least a little wet unless you’re in a boat, which isn’t really tubing.
  • Sandals: I find that they are extremely beneficial, especially if you aren’t used to walking on rocky surfaces. It’s a stream; there will be rocks. And occasionally you will have to get out of the tube to walk it through shallow areas. I prefer sandals that have a strap to keep them from sinking into the mud and staying there; others prefer the cheapest ones they can find because there is a chance they’ll get lost at some point. It’s up to you, but I recommend having something that you don’t mind getting wet (avoid leather or light color cloth unless it cleans up easily).
  • Dragging items: Sometimes there just isn’t room for everything you want to have with you. You’ll have the cooler, but who wants to put empty cans back in with the cold ones? Clipping a garbage bag or some sort of sack to collect your garbage will be helpful. Also, if you’re short on space, consider clipping a string with all of your group’s shoes to the tube so they don’t fall out at some point. You can even attach 6-packs of beverages because the river water will keep them cool.
  • Check the weather: Make sure you aren’t anticipating any storms during your tubing adventure. If severe weather does crop up, you should exit the water and wait it out under a tree on the shore. Do not stay in your flotation device during lightning.
  • Know the water source: Depending on recent weather patterns, the river you’re traveling may be high or low. You should check with local officials (the tubing company or DNR) to determine if there are any obstacles you should know about. When a river is low, there may be more rocks that could hinder a pleasant experience. When the water is high, it travels quicker, which could be dangerous. Also, you’ll sometimes see people jumping out of trees into the water; before attempting anything of the sort, check the depth of the water and make sure it is going to be a safe landing free of rocks. Just because someone did it last year in that spot doesn’t mean the water levels are safe enough to do the same this year. Consider that it will take significantly longer to get medical attention while on the water.
 

Travel often…

30 Jul

This sums up my thoughts pretty darn well…

Travel

Cave Point County Park, Door County, WI


Donating blood: a positive or negative experience?

29 Jul

It’s summertime and at my job I’ve gotten several press releases stressing the importance of donating blood now because of a decline in donations due to family vacations and busier schedules. I thought, “Now is the time I’m going to try that, and while I’m at it I’ll make it into a positive, uplifting story for the readers of my newspaper.”

I was super excited about this. I told everyone I was going to donate blood for the first time. I even had the opening line for this blog written and knew exactly what I was going to say about my experience. I was pumped.Blood Did you know

And then I was pumped literally and the experience deflated to far less than excitement. I didn’t anticipate that my donation wouldn’t be acceptable, that they would have to discard it.

Here’s what happened:

I got to the blood donation site, a Catholic church in Benton. I told the proper authorities at the site what my mission was: first time blood donation and publicity. They were thrilled. I checked in, read the lengthy packet on the risks, reasons why a donation won’t be accepted and what to expect throughout the process. I read the whole thing. Well, maybe only 90 percent of the words (it’s weird having someone watch you read a document). Then I moved to a new seating area to alert the phlebotomists that I was ready for my health history and physical.

I didn’t have to wait long and pretty soon I was answering questions and getting my finger pricked to test for iron. Everything was going smoothly. I was in great shape for making a donation, and my O- blood type meant my donation was extra special (universal blood donor, so my blood could be given to anyone in need).

It was finally my turn. I told them which arm I’d like used, mainly so I could still hold my camera and document the entire process. My veins disagreed. I guess I had better veins in the other arm, so they wanted to use that one. Okay. I’ll do what I have to.

They took a test tube, maybe more, I really don’t remember since I wasn’t looking. If I don’t look at the needle, I don’t feel it as much. Then the bag was hooked up and I was off, squeezing the little ball to keep the blood pumping.

Unfortunately, when I was stuck with the needle, my vein bruised and it started clotting before my full donation was accomplished. I was told that since I only donated 420 of the 470 ml of blood, my donation would be too thin with the amount of blood thinner already in the bag. Another phlebotomist wiggled the needle around for a while to see if it would start flowing again, but that, of course, was painful and didn’t work.

My heart sank and my emotions went out of control. I started to feel nauseous and dizzy, which only made things worse. Before I knew it I was lying on my side with a cold cloth over my forehead and people running to grab me a bucket. I assured them it was nothing that bad. But, the pampering meant I was the center of attention, which was exactly what I didn’t want. I’m a journalist, I’m used to being the observer, not the one everyone is watching.

I took my bandaged arm over to the recovery area and couldn’t even enjoy the cookies and strawberry sundae. At this point I was the only donor left in the place and all eyes were on me. I couldn’t control my crying, especially with all of the comforting words from the volunteers. I kept telling them I didn’t know why I was crying. I just needed to be left alone, but after my symptoms following the needle removal, that wasn’t going to happen.

My arm had quite the bruise. And it got bigger and more colorful every day. After a week it stopped growing and started disappearing. It was a long week of explaining my situation, though.

Looking back, I was just upset from having my donation refused, and for reasons out of my control. I thought it was going to be a positive experience, that I’d want to be a regular donor, but now I’m unsure that I want to try again. I know, I know, it’ll be better next time, don’t give up. Still… It took me this long to decide to donate and then the pain and bruising was all for nothing.

While this isn’t a travel topic, I wanted to include it here because you can donate blood from almost anywhere. And, I found out that if you have traveled to certain countries in the last few years they may not want you to donate because of possible exposure to certain things.